All wool is not created equal. Some types felt quickly and tightly, while others resist no matter how long you poke them. The wool you start with will shape your experience more than any other material — so it’s worth choosing wisely.
For beginners, I always recommend starting with a high-quality core wool in a neutral, undyed color. Most suppliers carry an off-white or natural core wool that’s perfect for building the base of your sculptures. It’s usually less expensive than dyed wool, so you can use plenty of it as your foundation and save your colored fibers for the outer layers and finishing touches.
One of my favorite sources is Living Felt. They carry a wool called MC-1, which is a beautiful core wool batting that comes in many colors — but their natural off-white core is the one I reach for most often. It felts smoothly, builds volume easily, and gives you a solid, forgiving base to work on.
Once you’re comfortable shaping and layering, try experimenting with merino top coats. Merino has a soft texture and fine fibers, making it wonderful for blending colors, adding fur, or creating subtle surface details. You’ll notice merino listed with a micron count — the higher the number, the softer the wool. For most felting, look for merino around 21 microns, which balances softness and ease of control beautifully.
As you gain experience, start branching out and trying different fibers — corriedale, blue-faced leicester, shetland, and blended batts each behave differently, and discovering your favorites is part of the fun.
To make things easier, I’ve put together a full resource list of trusted suppliers from around the world:
In the beginning, I broke more needles than I’d like to admit. I treated them like disposable supplies instead of precision tools. Needles aren’t just something you use — they’re an extension of your hand, and each one has a purpose. When you start to “pair” the right needle with the right job, everything gets easier: cleaner surfaces, faster shaping, and far fewer snapped tips.
Gauges (thickness) and what they’re good for
32–34 gauge (very coarse/coarse): Fast compaction, great for big, airy shapes and firming cores quickly. These leave visible holes on the surface, so use them for early stages only or for deeply buried layers.
36 gauge (coarse): My go-to for early shaping and joining pieces. Strong, efficient, and still fairly forgiving.
38 gauge (medium): The all-around workhorse. It firms forms, refines edges, and transitions nicely from building to smoothing.
40 gauge (fine): For surface work, blending colors, and tightening details without scarring the wool.
42 gauge (extra fine): Think micro-refinement — crisp features (eyelids, tiny ears, beaks), closing needle marks, and finishing delicate areas without over-compressing.
Barb styles (shape) and why they matter
Triangle: The standard. Reliable for almost every task; easy to control.
Star (four-sided): More barbs engage the wool, so it felts faster with less effort — lovely for speeding up core work without jumping to a coarser gauge.
Spiral/Twisted: Twisted shaft rotates fibers as it enters, creating a smoother surface and reducing visible holes — wonderful for finishing and blending coats.
Crown/Micro-crown: Only a few barbs at the very tip. Designed for ultra-fine surface work (placing whiskers, eyelids, nostril edges) where you want movement without deep penetration.
Reverse (inverted barbs): Pulls fibers out rather than pushing them in. Use lightly to tease the underlayer to the surface for fur, feather tufts, or blended transitions. Start with a finer reverse (40–42) to avoid over-fluffing.
How to choose — stage by stage
Rough-in (building the core): 36 triangle or 38 star to compact quickly without shredding.
Forming and joining: 38 triangle/spiral for edges, seams, and attaching limbs. If you’re working over a wire armature, switch to a finer needle (40 triangle) near the wire to reduce snap risk.
Refining planes and features: 40 spiral for smoothing; 42 triangle or crown for crisp, tiny adjustments.
Finishing and textures: 40–42 spiral to remove holes and blend color changes. Then a reverse needle in light, shallow passes to lift subtle fibers for fur or downy effects.
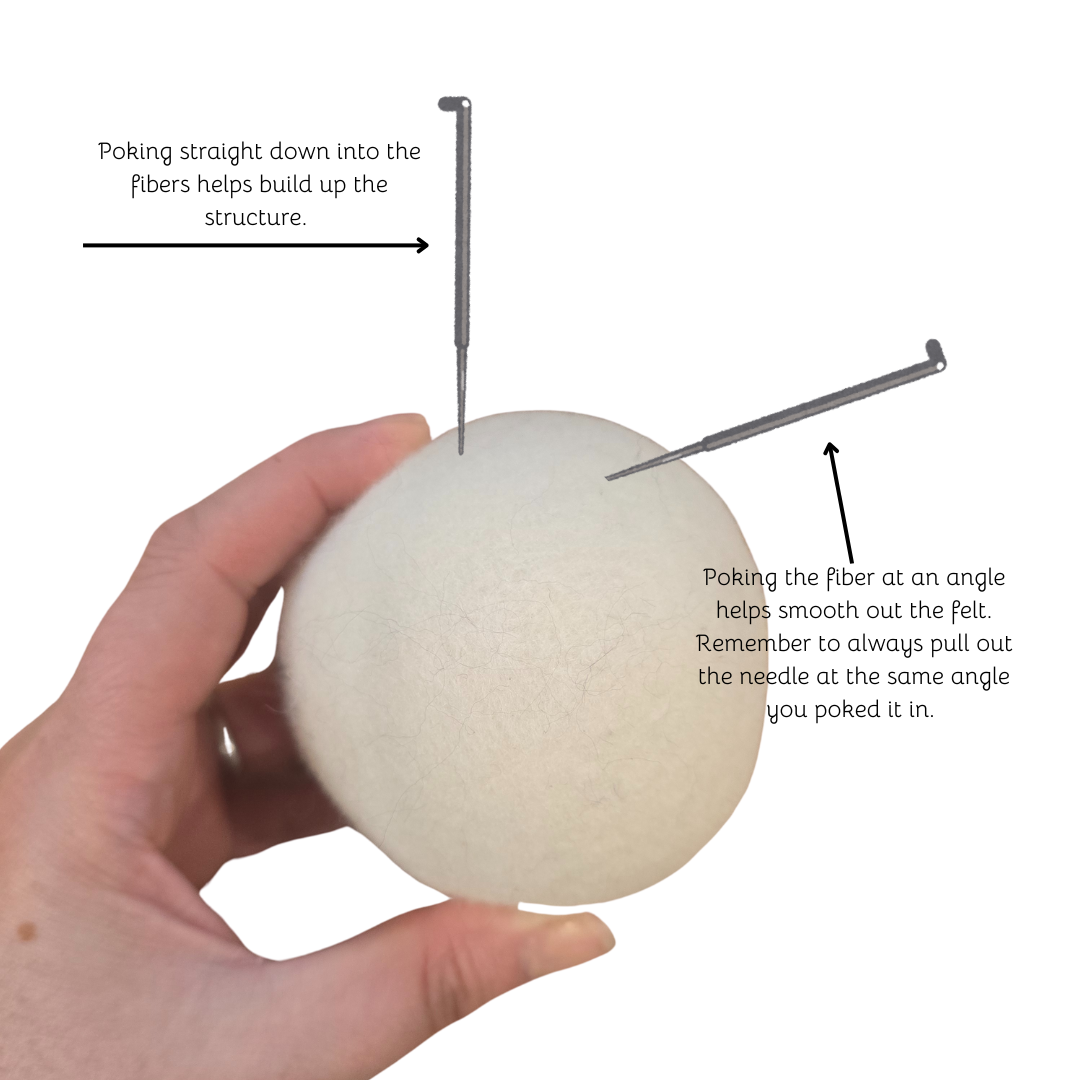
Depth, angle, and rhythm (the break-proof trio)
Most breakage comes from side pressure, not from “how hard” you poke. Keep these three in mind:
Angle: Enter straight relative to the direction you’re moving. Avoid prying or bending the needle inside the wool. Rotate the piece to suit the needle, not the other way around.
Depth: Match penetration depth to the job — deep for core building, shallow for surface work. Finishing needles only need a few millimeters to do their job.
Rhythm: Fast, light, consistent pokes beat slow, forceful jabs. Let the barbs do the work.
Working with armatures (wire, pipe cleaners, floral wire)
Pad wires generously with core wool before felting tight; metal + sideways force is a common snap point.
Near wire, switch to a 40 (or even 42) and shorten your stroke so you’re only engaging the outer fiber.
If you catch the wire, stop. Back out straight, rotate the piece, and re-approach from a safer angle.
Speed vs. control
A multi-needle tool (2–3 needles) speeds up large flats and early stages. I prefer 38 stars for speed and swap to singles for detail.
For tiny work (nostrils, eyelids, claws), a single 42 or crown gives precision without scarring.
Surface quality fixes
Visible holes or pilling? Try a 40 spiral with shallow, sweeping passes to reorient fibers.
Over-compressed or shiny? Brush lightly, add a whisper of matching fiber, and rework with a 40 triangle.
Fuzzy edges you want to keep? Finish, then use a reverse needle to lift selective fibers and set the texture.
A simple starter set I recommend
36 triangle (core build), 38 star (efficient shaping), 40 spiral (finishing/blending), 42 triangle (micro-detail), and a 40 or 42 reverse (fur/texture). Add a 2–3 needle holder for early stages. Label them and store in a cork or felt needle book so you always know what’s in your hand.
Learning to angle your needle slightly and avoid stabbing straight down will save you a lot of frustration (and broken tips). And remember — felting is about rhythm, not force. The wool listens better when you’re gentle.
It’s tempting to jump right into adding color and detail, but strong foundations make strong sculptures. Take your time building the basic shape — the armature or core body. Think of it as sculpting in soft clay. If the base isn’t solid, no amount of surface work will save it.
When I started, I used to rush ahead, eager to see the personality of the animal appear. More than once, I ended up with a bird whose body sagged when I attached the wings or a fox whose head tilted permanently to one side. That’s when I learned one of felting’s biggest secrets: the unseen part of your piece matters just as much as the visible one.
A well-built core isn’t about perfection — it’s about density and proportion. You want the shape to feel firm but still have a little give when pressed. If it’s too soft, details will vanish as the wool continues to compact. If it’s over-felted too early, you’ll struggle to attach new fibers or reshape later on. The sweet spot is a base that holds form but still accepts the needle easily.
Building the foundation is where you teach your wool to listen to you. Every poke communicates direction, compression, and intent. Slow, even stabbing builds structure from the inside out. When you move on too quickly, the outer layers tighten before the center does, leaving a hollow or spongey interior that won’t age well over time.
Here’s what to focus on while building the foundation:
Start simple. Begin with basic shapes — spheres, ovals, cones, and cylinders. These are the bones of nearly every animal form.
Check proportions early. Hold your piece at arm’s length or compare it to a reference photo. The silhouette should already suggest the creature before you ever add color.
Work from large to small. Core the main body first, then limbs, tail, and head. Attach pieces loosely, refine connections, and only then begin firming transitions.
**Add core wool in small, manageable amounts as you go. It’s much easier to felt small pieces and build them up than to start with one large pile and try to compact it into shape. Working in thin layers helps maintain control over your proportions and keeps your sculpture balanced. Adding a bit at a time also lets you correct small mistakes early—too much wool too soon can quickly throw off scale, and taking wool away is never as easy as adding more.
Layer strategically.** Build in thin, even additions rather than big clumps — this gives you control and keeps the interior density consistent.
If you’re using an armature, wrap it evenly with strips of core wool. Avoid leaving any exposed wire; bare spots can slice needles and create weak points. Use floral tape or thin batting to anchor layers before felting tight. The goal is not to hide the wire but to give it a padded skeleton that you can sculpt around.
Signs your foundation is ready:
It holds its shape when lightly squeezed.
You can insert a needle and feel mild resistance without excessive bounce.
When you tap it on the table, it sounds slightly solid rather than muffled.
If it still feels soft or wobbly, keep going. Patience here will reward you later — especially when you start attaching fine details like ears, paws, or beaks. A stable foundation gives you freedom; it’s what allows your imagination to build confidently on top.
So, slow down. Let this stage be meditative. Every minute spent shaping the base is an investment in how lifelike your final piece will be. Felting rewards those who listen to the wool, and the foundation is where that relationship begins.

Every felter has a stage where their piece looks... well, weird. I still hit that point with almost every project. Don’t panic when your fox looks like a potato with ears or your bird resembles a lumpy marshmallow — that’s completely normal. The awkward stage is a sign that you’re in the middle of building something real.
Needle felting is sculpting in reverse. Instead of carving away like a woodcarver or potter, we’re slowly building form by layering fibers into place. That means there’s always a point where things look off-balance or unfinished. The trick is to recognize that awkwardness as progress. It’s not a mistake; it’s simply part of the visual story of how the piece finds its shape.
At first, your proportions may look strange, limbs too short or too thick, heads a little too big — resist the urge to overcorrect too soon. The wool will shift and settle as you add layers, and what looks wrong at one stage often falls perfectly into place later. Felting teaches patience and trust. The more you learn to see potential instead of perfection, the stronger your work becomes.
There’s also something psychologically valuable about that awkward phase. It’s where creative resilience is built. Your brain wants closure — it craves a finished form — but felting asks you to stay in uncertainty for a while. That’s where skill grows. Every artist develops a relationship with that discomfort; learning to keep working through it is one of the most important parts of mastering this craft.
When the shape feels wrong, try stepping back. Look at it from a distance, turn it in your hands, or compare it to a reference photo. You’ll start to notice which areas need more volume or tightening. Sometimes I even set the piece aside overnight and come back with fresh eyes — nine times out of ten, it looks far better than I remembered.
If you truly feel stuck, start a small side project. Making something simple — a quick ornament, a tiny animal head, or even a wool ball — lets your hands keep moving without pressure. Often, clarity strikes once you stop forcing it.
Remember, the magic always shows up after patience. Every smooth finish and lifelike detail you admire in another artist’s work went through this same messy middle. Let your work look odd for a while. That’s the stage where the wool and your imagination start to meet each other halfway.

. You Don’t Have to Figure It Out Alone
When I started, there weren’t many places to learn. I would have given anything for a community — people to ask, classes to follow, or just reassurance that I was doing it right. That’s why I created Rustic Fiber Academy.
Inside the Academy, you can choose your level — beginner, intermediate, or advanced — and get access to step-by-step tutorials, downloadable guides, and a welcoming community of artists who love helping each other grow. You can even start with a two-week free trial and explore any course that fits your level.
Felting doesn’t have to be guesswork. It can be joyful, peaceful, and deeply rewarding — especially when you learn with others who understand the bumps along the way.
. Needle felting is one of those crafts that looks simple but unfolds in layers. Every poke teaches you something new — about patience, problem-solving, and the quiet kind of creativity that asks for your full attention.
If you take one thing from this post, let it be this: don’t rush it. Enjoy the process, celebrate the awkward stages, and let your hands learn in their own time. You’ll be amazed how quickly it all starts to make sense.
Happy felting,
Christie
Rustic Fiber Academy